DIY Photo Keepsake Vase | How To Add Photo To Glass Vase | Decoupage
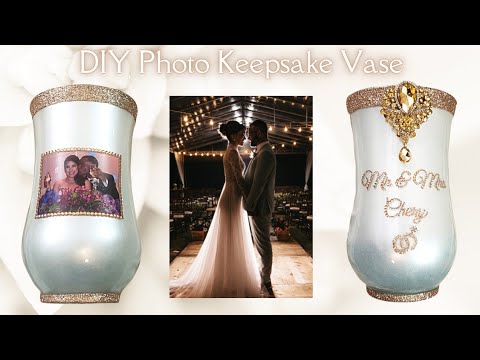
I made this photo keepsake vase using the reverse decoupage technique. This vase can be used with real water and flowers if you use all the right glues and seals. I was so happy to finally finish and share. You can make all kinds of photo keepsake vases using this method. Mother's Day, Birthdays, anniversaries, and the list goes on. Please show your support by liking, commenting, and sharing the video. See you next Friday my crafty fam! God Bless!
If you recreate my work, I would love to see it, and please remember to give create to the original artist. Thank you!
What I Used:
1.) Glass Vase
2.) Laser Photo Printout (I cover this in the video)
3.) Mod Podge (Use the dishwasher safe one)
4.) Pearl White Paint and Gold Spray Paint: I no longer support companies that make shimmery/metallic products with unethically sourced mica powder. The pearl and the gold spray paint I used have been in my supply stash for years. As I restock, I will make sure they use fair trade mica only.
Important Mica Documentary
https://www.youtube.com/watch?v=IeR-h9C2fgc
https://www.youtube.com/watch?v=LS_CR7UwhRs
5.) Letter Templet (I cover this in the video)
6.) Painters Tape
7.) Plastic Bags
8.) Champagne Loose Glitter
9.) Glitter Sealer
10.) Champagne Rhinestones. ( 2mm and 3mm)
11.) 4 Clear 4mm Square Rhinestones
12.) Gem-Tac
13.) Crystal Katana
14.) White Crafting Felt
15.) TearDrop Brooch ( I ordered mine from eBay in 2019)
16.) Hot Glue
A tiny bit about myself:
Hi, my name is Ivelisse. I've been artistic and creative my whole life. Unfortunately, it wasn't an easy one. I'm a survivor of many trials and tribulations. All the trauma caused me to develop serious mental health issues. I was self-medicating by using drugs and alcohol for over twenty years. On August 1st, 2014, I threw myself at the mercy of the Lord and prayed to be saved. I've been sober and clean ever since. Amen! I started living for the first time since I was a little girl. It all started with my health/fitness and, soon after, I found myself itching to get back to my passion, my art! But, I didn't just want to do it for myself. I wanted to share that joy with others. Not long after, I created my YouTube channel DIY No Need To Cry! I took the very bottles that were killing me and started to turn them into art. It's also a place where I get to share what I know and learn from others along the way. I also wanted to create a fun and safe space. I'm a very dorky person, and if I could make just one person smile, in a world full of hardships, if only for a brief moment, in a world that can be cruel at times, then I wanted that opportunity. With each piece I create, I replace a bad memory and create new ones with you! Welcome to the crafty fam! God bless you all!
Business Inquiries ONLY Email:
diynoneedtocry@yahoo.com
Follow me:
My Instagram:
https://www.instagram.com/diynoneedtocry/
My Twitter:
https://twitter.com/DIYNoNeedToCry
My Facebook:
https://www.facebook.com/DIY-No-Need-To-Cry-563516063850901/
#DIYPhotoVase #PersonalizedVase #Decoupage
***NO PERSON OR PARTY HAS PERMISSION TO DOWNLOAD THIS VIDEO, AND RE-UPLOAD IT IN A COMPLETE OR ALTERED STATE****
DIY Photo Keepsake Vase, How To Add Photo To Glass Vase, Decoupage, Reverse Decoupage, How To Put Pictures On Glass, DIY Photo On Glass, Photo Keepsake Ideas, Photo Keepsake craft, DIY Photo Vase, Custom Vase, picture on glass DIY, Picture on glass, Personalized Vase, DIY NO Need To Cry,


0 Comments